Armor now includes SOCKS5 protection. Explore Armor →
TorSentinel TorSentinel
TorSentinel Blog

TorSentinel VPN App: WireGuard Protection with Port Forwarding for Seeders

TorSentinel Team
Blog / TorSentinel VPN App
App Guide WireGuard Port Forwarding Windows

WireGuard VPN with Port Forwarding —
Built for Torrent Seeders

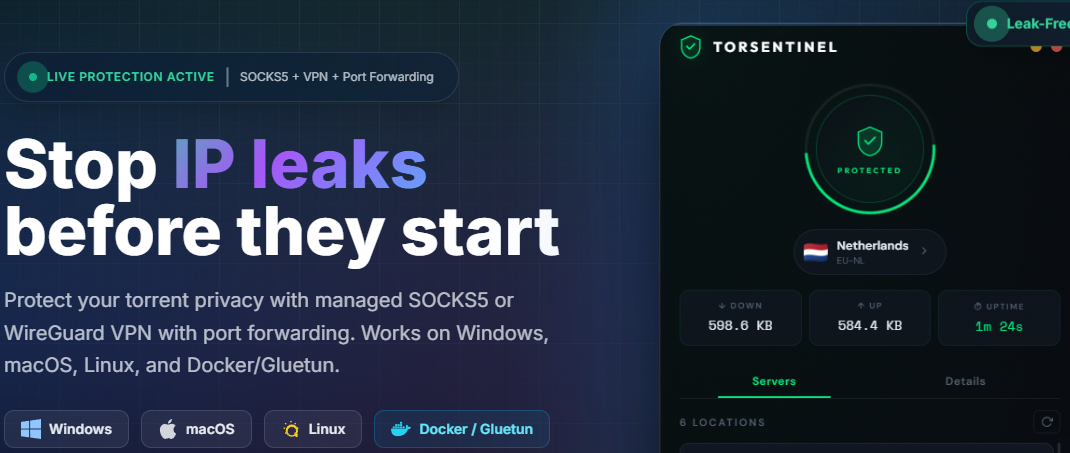
Most VPNs block incoming connections entirely, which kills your seeding ratios on private trackers. The TorSentinel VPN app is different — every one of its 6 server locations comes with pre-configured TCP and UDP port forwards that are live the moment you connect. System-wide WireGuard protection, zero router configuration, and forwarded ports ready to paste straight into your torrent client.

TorSentinel Team · Updated 2026 · 5 min read · Difficulty: Easy
TorSentinel VPN app showing PROTECTED status with Netherlands server and live traffic counters
What you'll need
  • Windows 10 or 11
  • A TorSentinel Armor subscription — provides VPN access and your port forwards
  • A torrent client with a configurable listening port (qBittorrent, Deluge, Transmission, etc.)
  • About 5 minutes

? Why does port forwarding matter for seeders?

When you connect to a regular VPN, your torrent client is stuck behind NAT — other peers can only reach you if you initiate the connection first. This cuts you off from a large portion of the swarm and tanks your upload speed and ratio.

Port forwarding punches a hole through the NAT so that peers can connect directly to your listening port. On private trackers where upload ratio determines your standing, this is the difference between hitting your required ratio and getting disabled.

Without port forwarding: peers can't initiate connections to you — upload speeds suffer, ratio drops
With port forwarding: full two-way connectivity — maximum seeders reached, ratio maintained
1

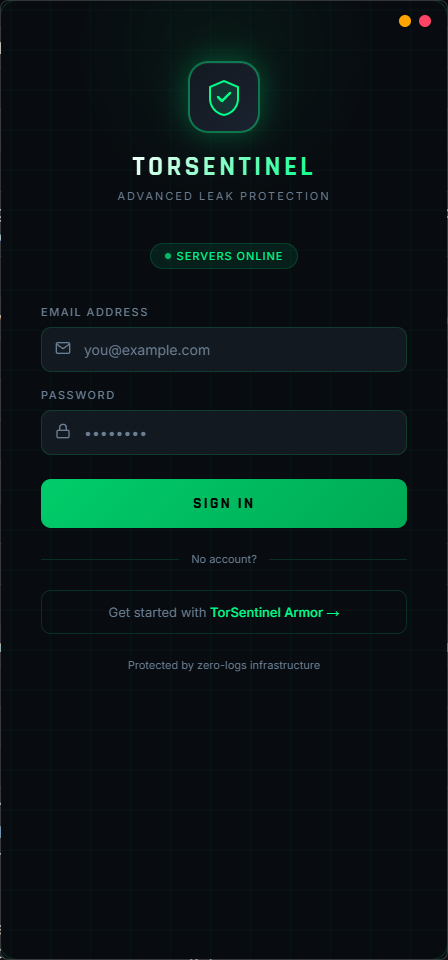
Download the app and sign in

The VPN app is included free with every Armor subscription. Download and run the installer — no admin rights required. On first launch you'll see the sign-in screen. Enter your Armor account email and password. The app will pull your VPN configurations and server list automatically.

TorSentinel VPN app sign-in screen showing email and password fields with SERVERS ONLINE status badge
Sign-in screen — the SERVERS ONLINE badge confirms the TorSentinel infrastructure is reachable. Enter your Armor email and password.
Download TorSentinel VPN v1.0.0 — Windows
2

Choose your server location

After signing in you'll land on the main dashboard with the Servers tab open. The app lists all 6 locations — tap any row to select it as your active server, then tap the ring to connect. France has 2 IPs available, giving you 8 forwarded ports across those two entries.

TorSentinel VPN app Servers tab showing 6 locations: Canada, France (2 IPs), Japan, Netherlands, Norway, Singapore with Singapore selected
Servers tab — 6 locations listed, Singapore selected (green left border). France shows 2 IPs — two separate servers with their own forwarded ports.
Location Region Forwarded ports
🇨🇦 Canada NA-CA 4 ports (2 TCP + 2 UDP)
🇫🇷 France EU-FR · 2 IPs 8 ports total
🇯🇵 Japan APAC-JP 4 ports (2 TCP + 2 UDP)
🇳🇱 Netherlands EU-NL 4 ports (2 TCP + 2 UDP)
🇳🇴 Norway EU-NO 4 ports (2 TCP + 2 UDP)
🇸🇬 Singapore APAC-SG 4 ports (2 TCP + 2 UDP)
Pick a location close to the tracker's primary user base for the best speeds. EU-FR or EU-NL are good defaults for most European private trackers.
3

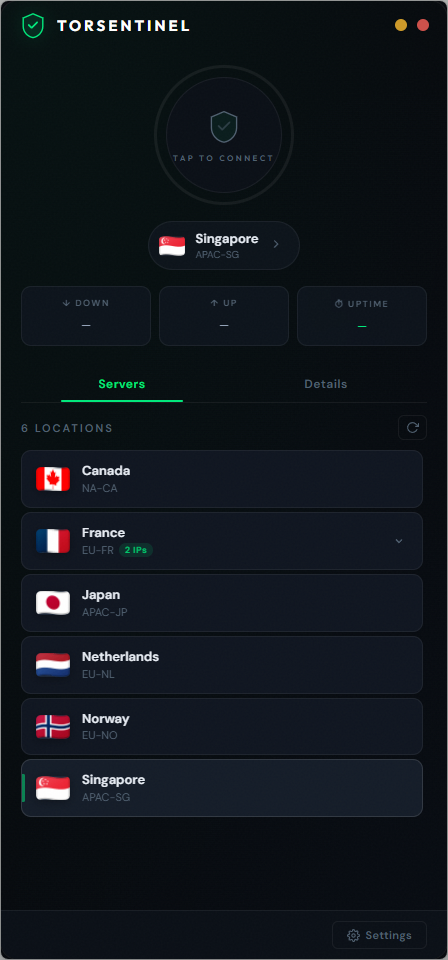
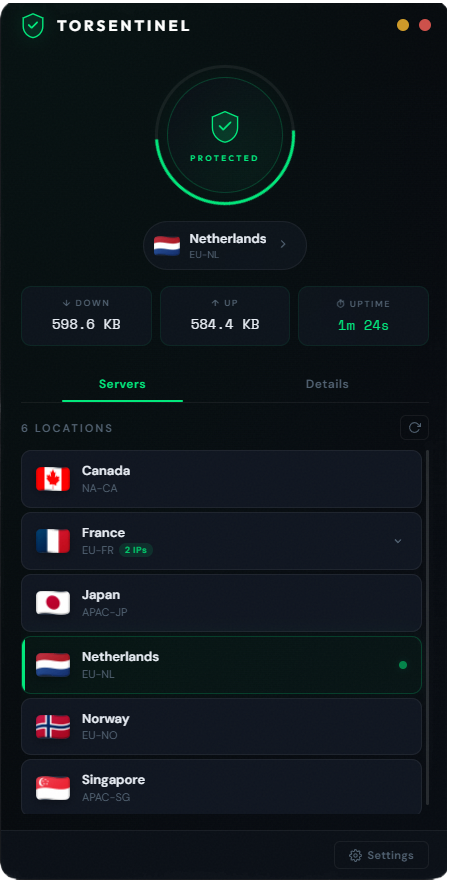
Tap the ring to connect

Tap the large ring on the dashboard. It transitions from TAP TO CONNECT to the animated green PROTECTED ring in a few seconds. The live ↓ DOWN / ↑ UP counters and session uptime start running immediately. Your entire system's traffic is now tunnelled through WireGuard.

TorSentinel VPN app showing PROTECTED status with Netherlands server active and live DOWN 598.6 KB UP 584.4 KB traffic counters
Connected — green PROTECTED ring, live traffic counters running. The selected server (Netherlands EU-NL) is shown below the ring with a quick-change arrow.
4

Find your forwarded ports in the Details tab

Tap the Details tab while connected. Under PORT FORWARDS you'll see your assigned TCP and UDP port pairs with a Copy button next to each. You'll also see your full connection details — server endpoint, internal IP, DNS, and protocol confirmation (WireGuard / UDP).

TorSentinel VPN app Details tab showing PORT FORWARDS with TCP 10000, TCP 10001, UDP 10000, UDP 10001 and Copy buttons, plus connection details showing Singapore APAC-SG server
Details tab — four pre-configured port forwards (TCP 10000, TCP 10001, UDP 10000, UDP 10001) with one-click Copy. Connection details confirm WireGuard / UDP protocol and zero-logs DNS (1.1.1.1, 1.0.0.1).
Example port forwards — Singapore
TCP 10000
TCP 10001
UDP 10000
UDP 10001
Endpointsg.torarmor.com:443
ProtocolWireGuard / UDP
DNS1.1.1.1, 1.0.0.1
Port numbers are assigned per-server and do not change between sessions — you only need to set them in your torrent client once per location.
5

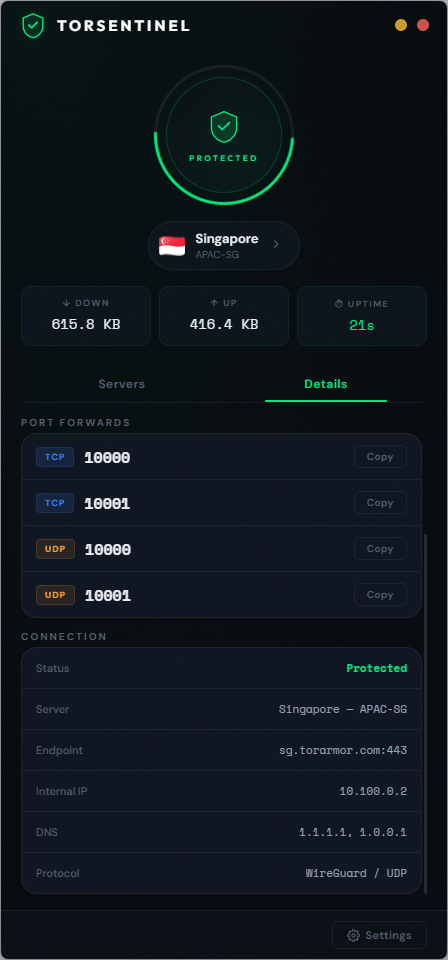
Set the listening port in your torrent client

Copy one of the TCP port numbers from the Details tab and paste it as the listening/incoming port in your torrent client. Use the same port number for TCP and UDP if your client has separate fields.

qBittorrent Tools → Options → Connection → Listening Port
Transmission Preferences → Network → Incoming Port (or "peer-port" in settings.json)
Deluge Preferences → Network → Incoming Port — uncheck Random, enter your port
µTorrent Options → Preferences → Connection → Listening Port — uncheck random port
After setting the port, restart your torrent client and run a port test inside the client (most clients have one under Connection settings). It should report the port as open.
6

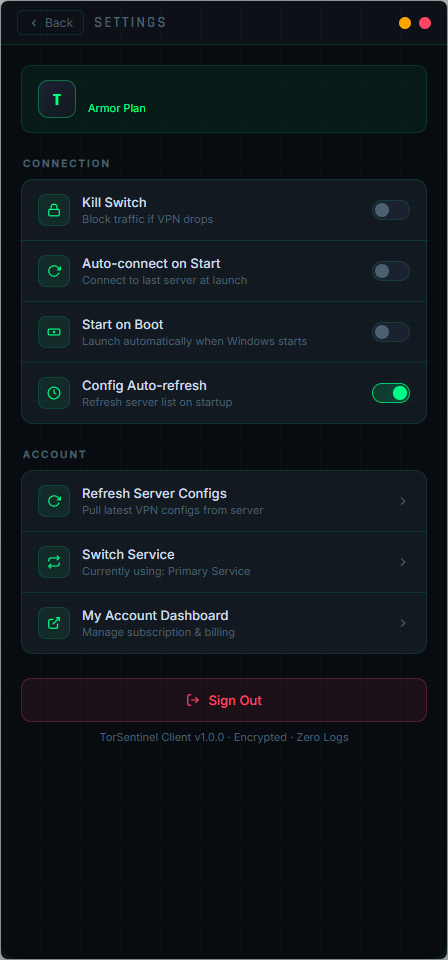
Configure Kill Switch and auto-connect (optional but recommended)

Tap Settings (bottom-right gear icon) to find connection options that harden your setup. These are especially important for always-on seedboxes and machines that restart automatically.

TorSentinel VPN app Settings screen showing Kill Switch, Auto-connect on Start, Start on Boot, and Config Auto-refresh toggles
Settings — Kill Switch, Auto-connect on Start, Start on Boot, and Config Auto-refresh. The app shows version and zero-logs confirmation at the bottom.
Kill Switch
Blocks all internet traffic if the VPN connection drops. Prevents your real IP from being exposed during brief disconnections or reconnects. Strongly recommended for always-on seeders.
Auto-connect on Start
Reconnects to the last-used server automatically when you open the app. No need to tap the ring each time.
Start on Boot
Launches the app automatically when Windows starts. Pair with Auto-connect for a fully hands-off seedbox setup — connect, reboot, and you're protected without touching anything.
Config Auto-refresh (on by default)
Pulls the latest server configurations from TorSentinel on startup so you always have the most current server list and endpoints.

What a correctly configured setup looks like

App ring shows PROTECTED in green with live traffic counters running
Details tab shows Status: Protected and your WireGuard endpoint
Torrent client port test reports the forwarded port as open
TorSentinel free IP scan shows a datacenter IP — not your home ISP

💡 Tips and notes

Use TCP ports for trackers, UDP for peers: if your client has separate TCP/UDP listening port fields, set the TCP forward for tracker announces and UDP for peer connections. Most clients use the same port for both — just pick one TCP port number.
Port forwards are per-location: if you switch from Netherlands to Singapore, go back to the Details tab and update the listening port in your client — each location has different assigned port numbers.
Docker / Gluetun users: your Armor account provides raw WireGuard config files. Use those in Gluetun with VPN_SERVICE_PROVIDER=custom and the pre-configured port forward will work identically in your container stack.
Also use the SOCKS5 proxy? You can run both simultaneously — the VPN protects your whole system while the Proxy Auto-Config app injects client-level SOCKS5 settings on top for an extra layer.
Refresh Server Configs: if you ever see connection errors or outdated endpoints, go to Settings → Refresh Server Configs to pull the latest configs from TorSentinel without reinstalling.
Setup checklist
Downloaded and installed TorSentinel VPN app
Signed in with Armor account — server list loaded
Selected a server location and tapped the ring — PROTECTED status confirmed
Opened Details tab — noted forwarded TCP and UDP port numbers
Pasted forwarded port into torrent client listening port setting
Port test in client reports port as open
Kill Switch enabled in Settings (recommended for always-on seeders)
Verified with TorSentinel free IP scan — proxy/VPN IP shown, real IP hidden

FAQ Troubleshooting

The ring connects but the port test in my client says the port is closed
Make sure you copied the port from the Details tab while connected to that specific server — port numbers differ per location. Also confirm the port is entered in the client's Listening Port or Incoming Port field (not the proxy port field). Restart the torrent client after changing the port, then re-run the test.
Kill Switch is blocking my internet after the VPN disconnected
That's Kill Switch working as intended. Open the TorSentinel app and reconnect to a server — internet will resume immediately through the VPN. If you need to temporarily disable Kill Switch, go to Settings and toggle it off, then reconnect.
TorSentinel IP scan still shows my real IP after connecting
Confirm the app ring shows PROTECTED and the Details tab shows Status: Protected. If it does but the scan still shows your real IP, your torrent client may have been open before you connected — restart it so it picks up the new network interface. Also check that DHT and Local Peer Discovery are disabled inside the client, as these can announce your real IP independently.
Connection fails — "could not connect to server"
Go to Settings → Refresh Server Configs to pull the latest endpoints. WireGuard uses UDP port 443 — if your network blocks UDP, try a different location (they each use the same port but different endpoints). Confirm your Armor subscription is active under Settings → My Account Dashboard.
Can I use the WireGuard config with Gluetun / in Docker?
Yes — your Armor account provides raw .conf WireGuard config files for each location. Use them with Gluetun (VPN_SERVICE_PROVIDER=custom), any WireGuard-compatible container, or the official WireGuard client on Windows. The pre-configured port forwards work identically in all of these.
Included with Armor

Get Armor — Unlock the VPN App

Armor gives you the WireGuard VPN app with pre-forwarded ports, the SOCKS5 Proxy Auto-Config app, and 24/7 realtime leak monitoring — all in one plan at $9.99/mo.