Armor now includes SOCKS5 protection. Explore Armor →
TorSentinel TorSentinel
TorSentinel Blog

Stop Configuring SOCKS5 Manually — TorSentinel Auto-Config Does It in One Click

TorSentinel Team
Blog / Proxy Auto-Config App
App Guide SOCKS5 Windows Auto-Config

Stop Configuring SOCKS5 Manually —
Auto-Config Does It in One Click

Manually editing proxy settings in every torrent client is tedious, error-prone, and easy to forget after an app update resets your config. The TorSentinel Proxy Auto-Config app scans your PC, finds every installed torrent client, and injects the correct SOCKS5 credentials automatically — no config files, no copy-pasting, no mistakes. Sign in with your Armor account for instant zero-config setup, or use manual mode to configure any SOCKS5 provider you already use.

TorSentinel Team · Updated 2026 · 4 min read · Difficulty: Beginner
TorSentinel Proxy Auto-Config app dashboard showing detected torrent clients and SOCKS5 protection status
What you'll need
  • Windows 10 or 11
  • At least one torrent client installed (qBittorrent, µTorrent, BitTorrent, Vuze, etc.)
  • A TorSentinel Armor subscription (for automatic credential setup) — or any other SOCKS5 proxy credentials for manual mode
  • About 2 minutes

? Why not just configure the proxy manually?

You can — and our other guides cover exactly that for qBittorrent, uTorrent, Transmission and more. But manual configuration has real failure modes:

A client update silently resets your proxy settings back to defaults
You install a second client and forget to configure the proxy in it too
A typo in the hostname or port leaves you unprotected with no warning
You have to repeat the same steps across every client on every machine

The Auto-Config app eliminates all of these. It reads your Armor credentials once, scans for every installed client, and writes the correct config — every time, with zero opportunity for human error.

1

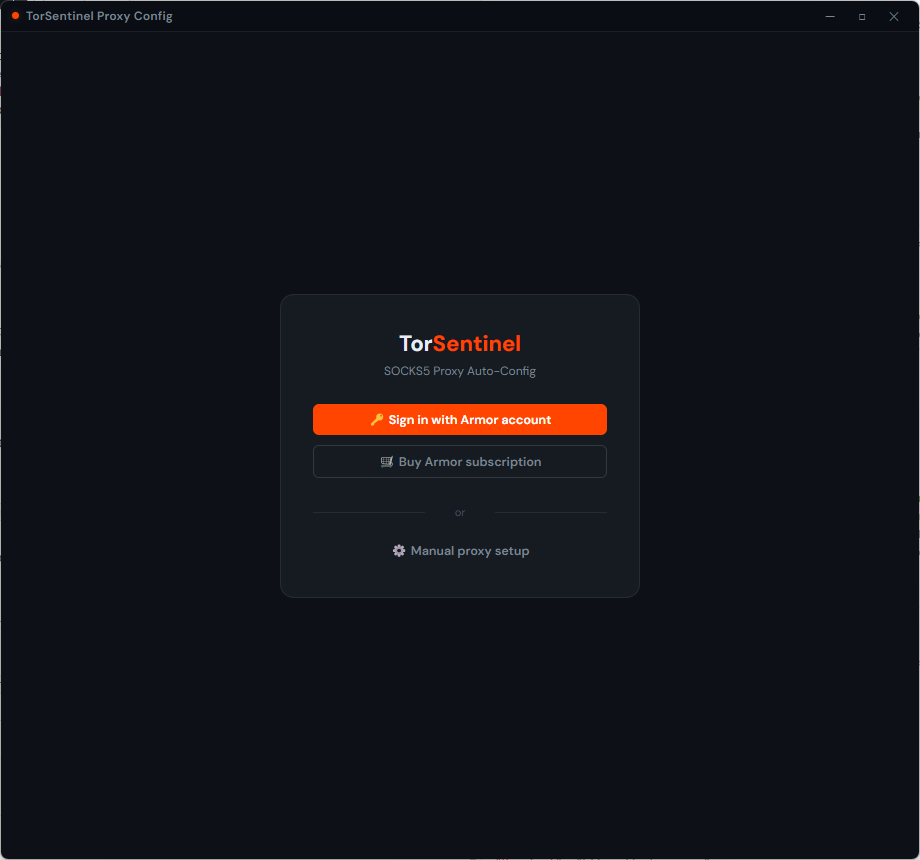
Download, install, and choose your mode

After installing the app you're presented with two paths. Choose the one that matches your setup:

🔑 Sign in with Armor account
Recommended. Your proxy credentials are pulled automatically — no typing, no copy-pasting. One click and the app is fully configured.
⚙ Manual proxy setup
Use any SOCKS5 provider. Enter your proxy host, port, and optional credentials manually. Works with Mullvad, AirVPN, iVPN, or any other provider.
TorSentinel Proxy Auto-Config app launch screen showing Sign in with Armor account, Buy Armor subscription, and Manual proxy setup options
Launch screen — sign in with Armor for automatic credential setup, or click Manual proxy setup to use any SOCKS5 provider.
Download Proxy Auto-Config v1.0.0 — Windows
Windows SmartScreen may show a warning on first run — this is normal for newly signed executables. Click More info → Run anyway to proceed.
2

Enter your proxy credentials

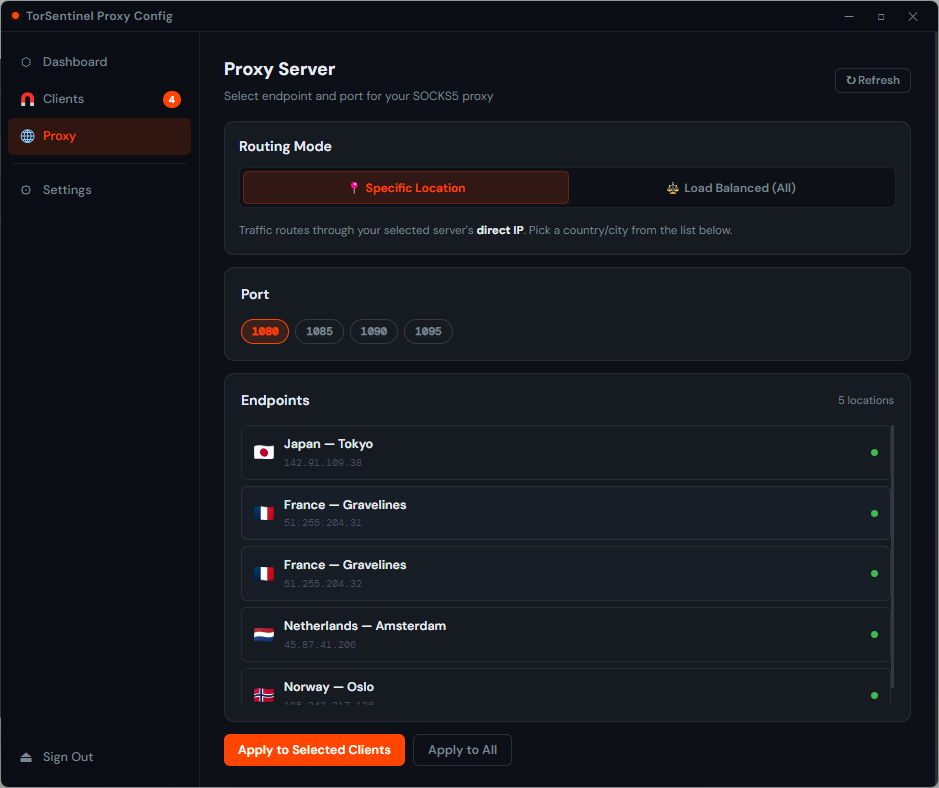
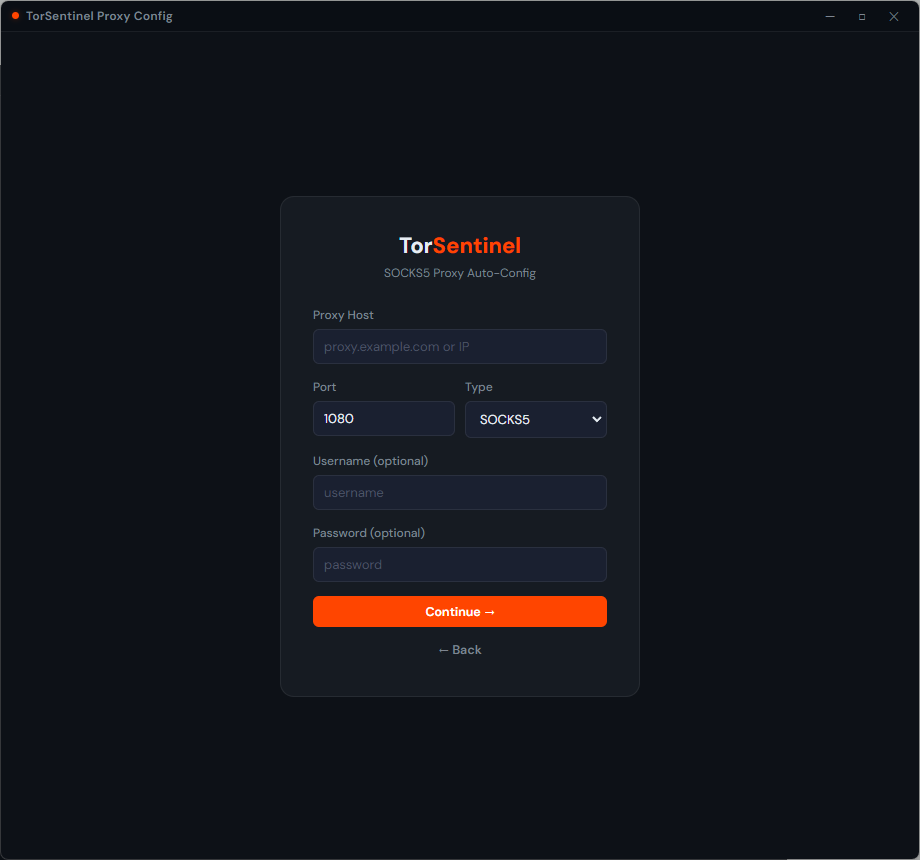
Armor mode: after signing in, your server, port and credentials are filled in automatically. Just pick a location and you're done. Manual mode: enter your proxy host, port (default 1080), proxy type (SOCKS5), and optionally a username and password for authenticated proxies.

Proxy tab — settings
Server proxy.torsentinel.com
Port 1080 (or 1085 if 1080 is blocked)
Location Choose any — Japan, France, Netherlands, Norway
Routing Load-Balanced or pick a specific location
Username your Armor username
Password your Armor password
TorSentinel Proxy Auto-Config app — Proxy tab showing server, port, location and credential fields
Proxy tab (Armor mode) — select your server location and enter credentials. Load-Balanced mode distributes traffic across all nodes automatically.
Manual mode — any SOCKS5 provider

Using a different provider (Mullvad, AirVPN, iVPN, your own server)? Click Manual proxy setup on the launch screen. Enter your proxy host, port, type, and credentials — then proceed exactly the same way to scan and apply.

TorSentinel Proxy Auto-Config manual proxy setup screen with proxy host, port, type, username and password fields
Manual mode — works with any SOCKS5 provider. Port defaults to 1080, type to SOCKS5. Username and password are optional for unauthenticated proxies.
3

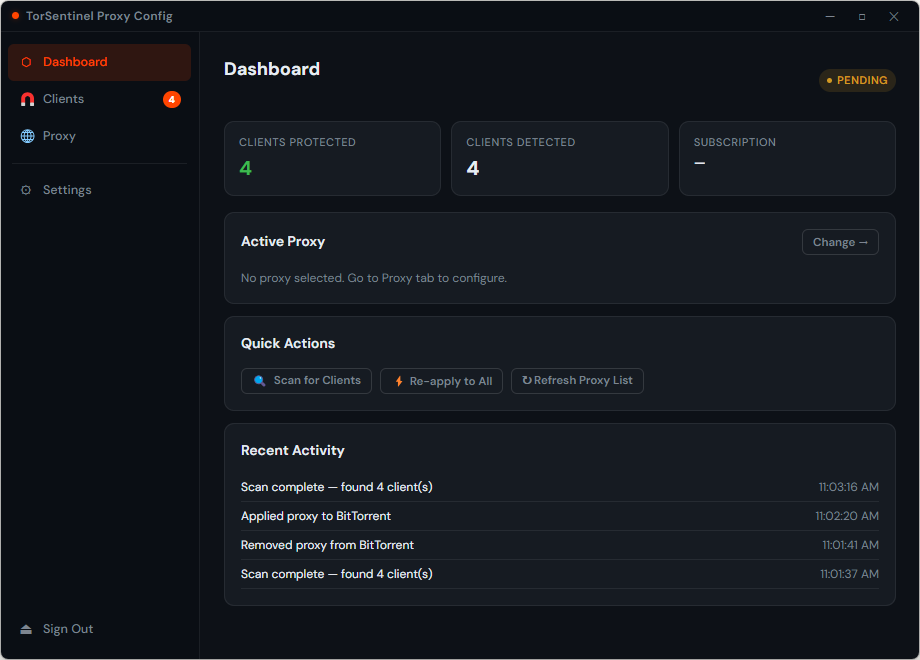
Click "Scan for Clients"

Switch to the Clients tab and click Scan for Clients. The app searches common install paths and registry entries for every supported torrent client. Each detected app appears in the list with its config file path and current proxy status.

TorSentinel Proxy Auto-Config app — Clients tab showing qBittorrent, uTorrent and Transmission detected with their config paths
Clients tab after scanning — each detected client shows its config file path and whether SOCKS5 is currently applied.
Supported clients
qBittorrent µTorrent BitTorrent Vuze / Azureus Transmission Deluge
4

Click "Apply to All" — done

Click Apply to All to push the SOCKS5 config to every detected client at once, or select individual clients if you only want to protect specific ones. Each row turns green with a PROTECTED badge the moment the config is written successfully.

TorSentinel Proxy Auto-Config app dashboard showing all clients with green PROTECTED status badges after applying SOCKS5
Dashboard after applying — all detected clients show green PROTECTED badges. The activity log records every action with a timestamp.
The activity log at the bottom records every apply and removal with a timestamp — useful for confirming that a client update didn't silently reset your settings.
5

Verify the proxy is actually working

Configuring the proxy and having it work are two different things. Run a live leak test to confirm your torrent traffic is actually going through the proxy and not exposing your real IP.

1
Go to torsentinel.com/torrent-ip-check and click Start Test — this generates a unique magnet link
2
Click Open Client to send the magnet link directly to your torrent app
3
Switch back to TorSentinel — Scan Results should show a datacenter IP (OVH, Hetzner, etc.) — not your home ISP
If the scan shows your real IP, re-open the app and click Apply to All again — the client may need to be restarted for changes to take effect. Close and reopen your torrent client, then repeat the test.

What successful protection looks like

All client rows show a green PROTECTED badge in the app dashboard
TorSentinel scan shows a datacenter IP, not your home ISP address
Activity log shows a successful Apply entry for each client
Scan Results status shows Peer detected — your client connected through the proxy

💡 Tips for keeping your protection current

Re-run after client updates: qBittorrent and µTorrent occasionally reset proxy settings on version upgrades. Open the app and click Apply to All again — it takes 5 seconds.
New client installed? Hit Scan for Clients again — the app will find the new one and show it as unprotected, ready to apply.
Port 1080 blocked? Change the port to 1085 in the Proxy tab and Apply to All again. TorSentinel Armor accepts both ports.
The app doesn't stay running: that's by design. It writes settings directly into each client's config file and exits — no background process, no system tray, no overhead.
Also use WireGuard VPN? You can run both — configure the SOCKS5 proxy inside your client for app-level protection and connect to the VPN for full-system coverage at the same time.
Quick setup checklist
Downloaded and installed TorSentinel_Proxy_AutoSetup_1.0.0.exe
Proxy tab — server set to proxy.torsentinel.com, port 1080
Armor username and password entered
Clicked Scan for Clients — all installed clients detected
Clicked Apply to All — all rows show green PROTECTED badge
Restarted torrent clients after applying
Verified with TorSentinel free scan — proxy IP shown, real IP hidden

FAQ Troubleshooting

My client isn't appearing in the scan results
The client may be installed in a non-standard path. Make sure it has been launched at least once (so its config file exists), then click Scan again. If it still doesn't appear, the client may not yet be supported — check the TorSentinel changelog for the latest supported client list.
The app shows PROTECTED but the leak test still shows my real IP
The torrent client must be fully restarted after the app writes the new config — it reads the config on startup, not live. Close the client completely (including the system tray), reopen it, then re-run the TorSentinel scan. Also confirm that DHT and Peer Exchange are disabled inside the client's own settings, as these bypass the proxy.
Windows SmartScreen blocks the installer
This is expected for newly published executables with a fresh code-signing certificate — SmartScreen builds trust over time based on download volume. Click More info on the SmartScreen dialog and then Run anyway. The app is safe to run.
Can I use this with a provider other than TorSentinel?
Yes — use Manual proxy setup on the launch screen. Enter your proxy host, port, type, and credentials from any provider (Mullvad, AirVPN, iVPN, your own server, etc.). The scan and apply workflow is identical. The Armor sign-in flow is simply a convenience shortcut that auto-fills your TorSentinel credentials.
Included with Armor

Get Armor — Unlock the Auto-Config App

Armor gives you the SOCKS5 gateway credentials, the Auto-Config desktop app, the WireGuard VPN app with port forwarding, and 24/7 realtime leak monitoring — all in one plan.