Armor now includes SOCKS5 protection. Explore Armor →
TorSentinel TorSentinel
TorSentinel Blog

How to Set Up qBittorrent with SOCKS5 Proxy (Anonymous Torrenting Guide)

TorSentinel Team
Blog / qBittorrent SOCKS5 Setup
Guide qBittorrent SOCKS5 Anonymous Torrenting

How to Set Up qBittorrent with a SOCKS5 Proxy
Anonymous Torrenting Guide

When you torrent without protection, your real IP address is visible to every peer in the swarm, your ISP, and copyright monitoring agencies. Setting up a SOCKS5 proxy in qBittorrent routes your torrent traffic through an intermediate server — the swarm sees the proxy IP, not yours. This guide walks through the full setup and shows you how to verify it actually works.

TorSentinel Team · Updated 2026 · 5 min read · Difficulty: Easy
qBittorrent connection settings showing SOCKS5 proxy configuration
What you'll need
  • qBittorrent installed (any recent version)
  • A SOCKS5 proxy with username/password auth — this guide uses TorSentinel Armor
  • About 5 minutes

? Why SOCKS5 and not a VPN for torrenting?

A VPN tunnels all your device traffic, which adds overhead and often reduces speeds. SOCKS5 works at the application level — only qBittorrent's traffic goes through the proxy while your browser and other apps are completely unaffected. For torrenting specifically, SOCKS5 delivers faster speeds with the same IP protection. The key requirement is that your torrent client supports SOCKS5 with authentication, which qBittorrent does natively.

1

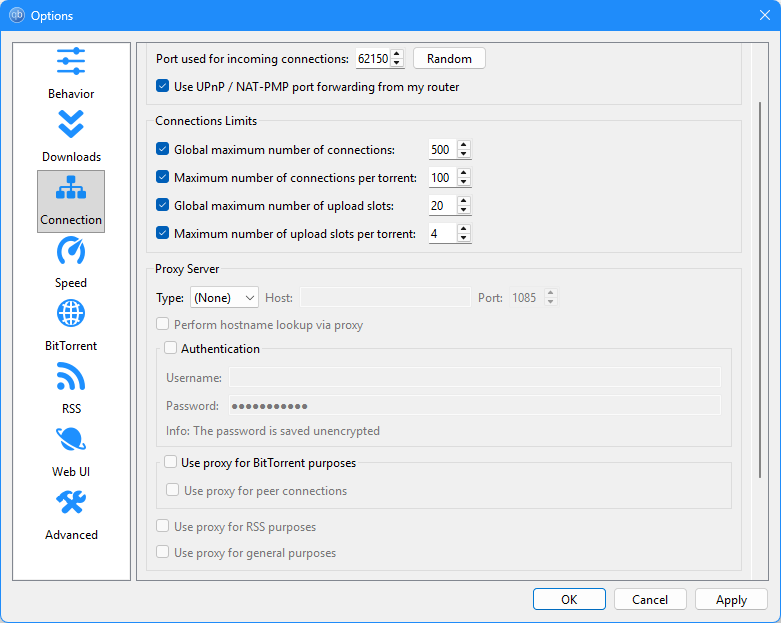
Open qBittorrent proxy settings

Open qBittorrent and go to Tools → Options → Connection. Scroll down until you see the Proxy Server section. By default it shows Type: None with all fields empty.

qBittorrent Options → Connection tab showing empty Proxy Server section
Tools → Options → Connection — Proxy Server section, default empty state.
2

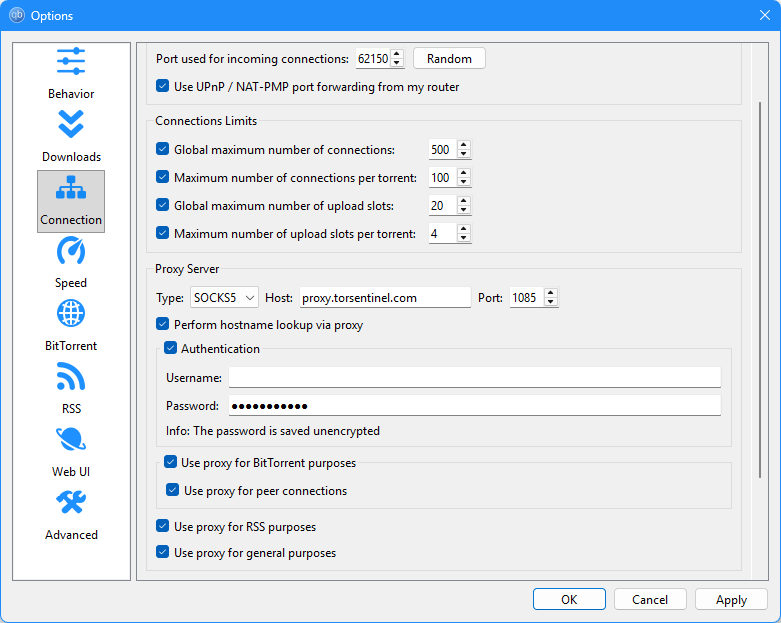
Enter your SOCKS5 details

Set the following values in the Proxy Server section:

Type:SOCKS5
Host:proxy.torsentinel.com
Port:1085
Username:your TorSentinel username
Password:your TorSentinel password

Check Perform hostname lookup via proxy, enable Authentication, then check all four proxy usage options: Use proxy for BitTorrent purposes, Use proxy for peer connections, Use proxy for RSS purposes, and Use proxy for general purposes. Click Apply → OK.

qBittorrent Connection tab with SOCKS5 proxy fully configured showing proxy.torsentinel.com
All proxy options enabled — hostname lookup, authentication, and all four BitTorrent proxy checkboxes.
3

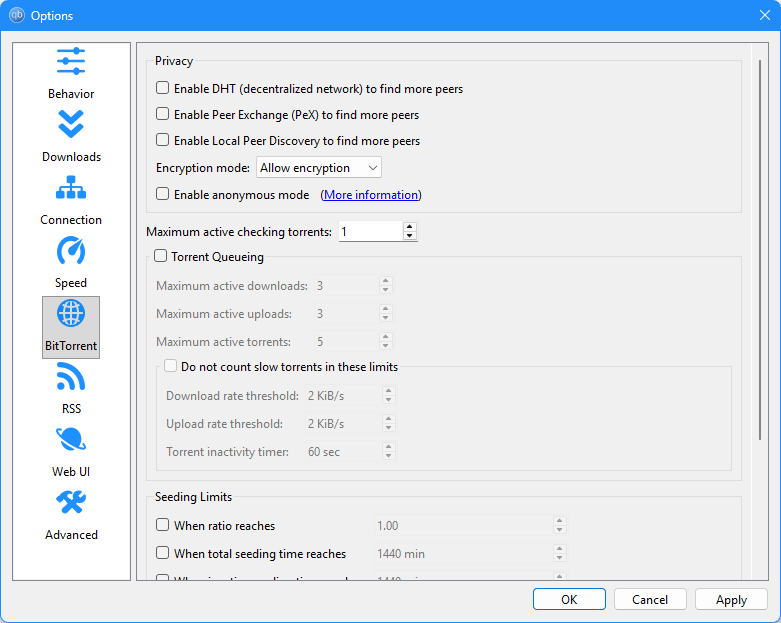
Disable leak sources

Go to Tools → Options → BitTorrent and uncheck all three Privacy options:

Enable DHT — announces your real IP outside the proxy
Enable Peer Exchange (PeX) — shares peer lists that may expose your IP
Enable Local Peer Discovery — broadcasts your presence on the local network
qBittorrent BitTorrent tab showing DHT, PeX, and Local Peer Discovery all unchecked
All three Privacy checkboxes unchecked — these bypass the proxy and expose your real IP if left enabled.
4

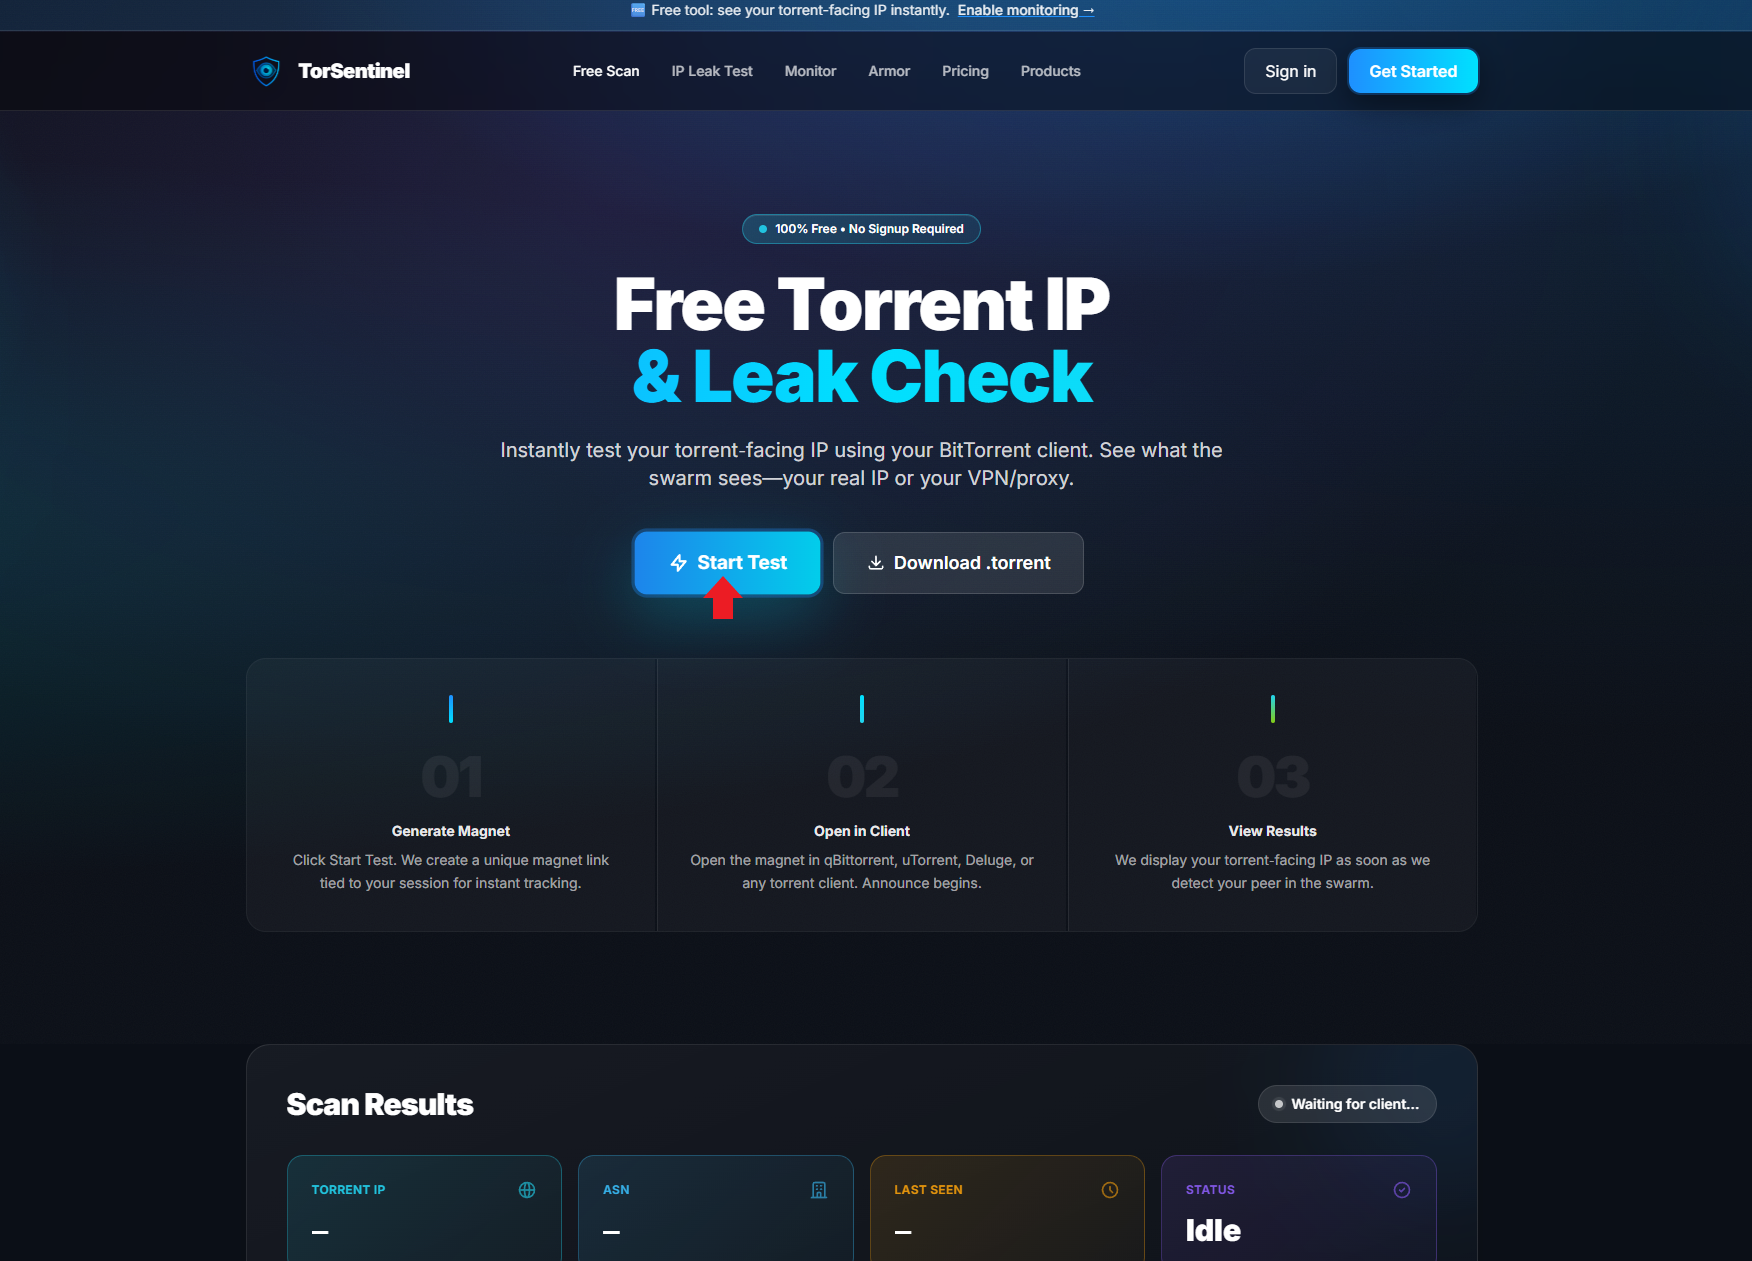
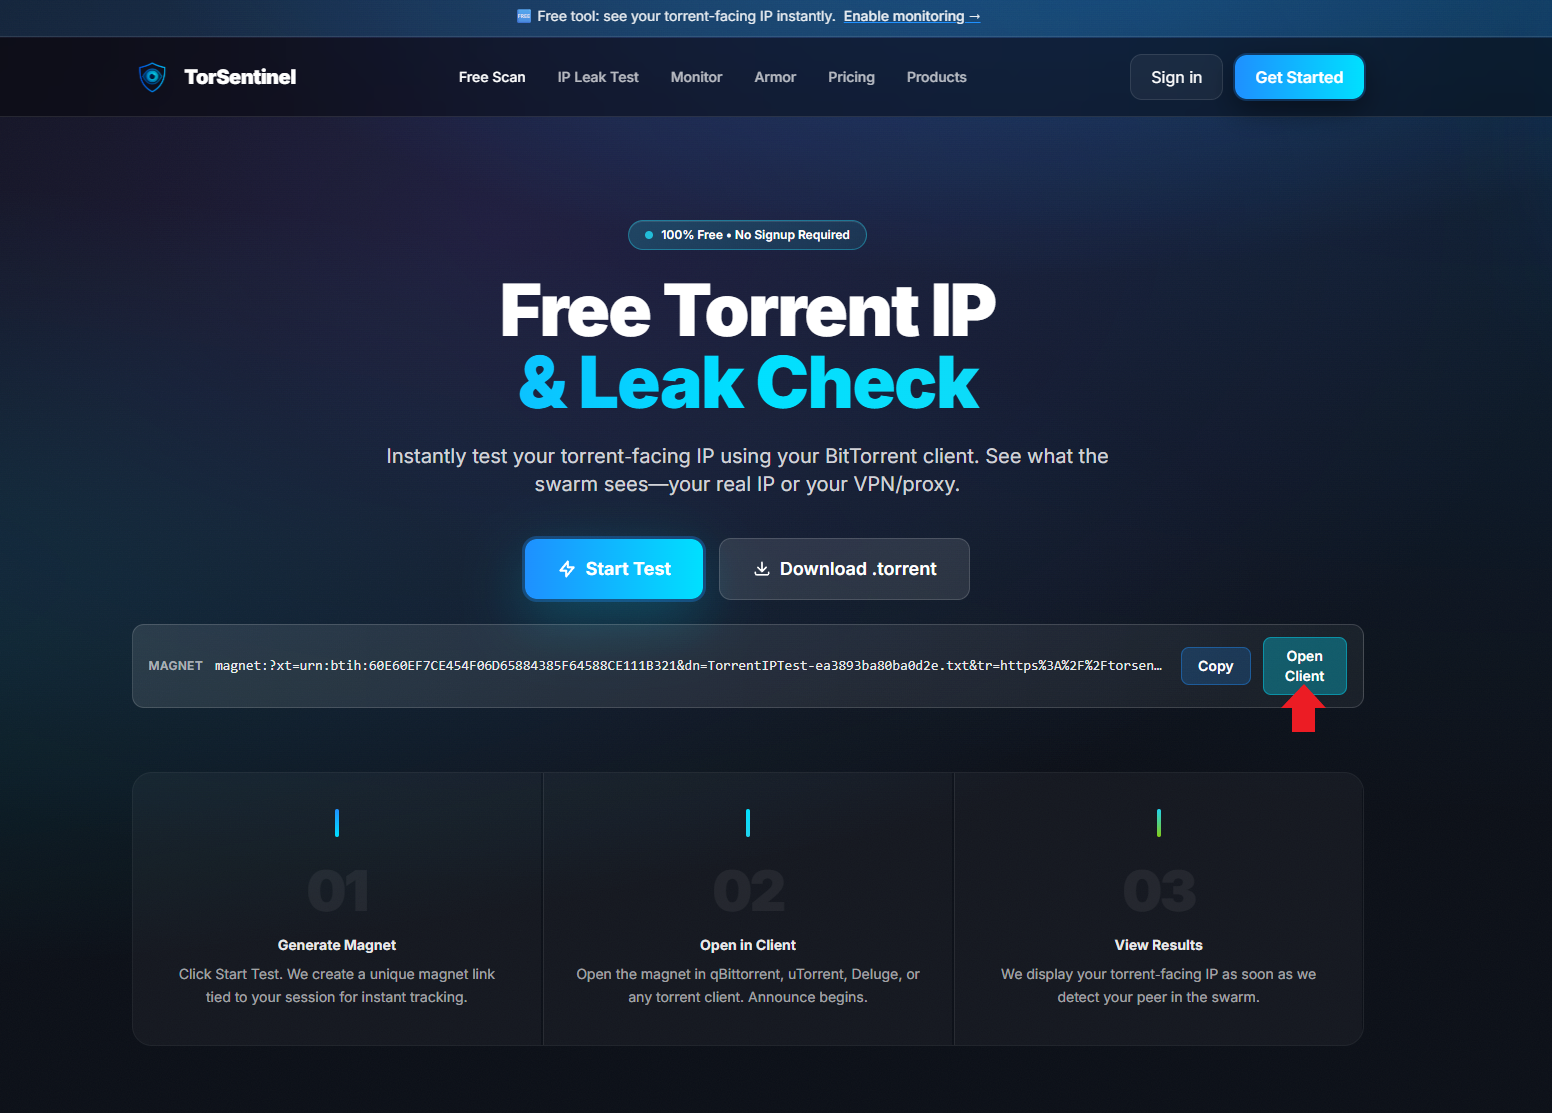
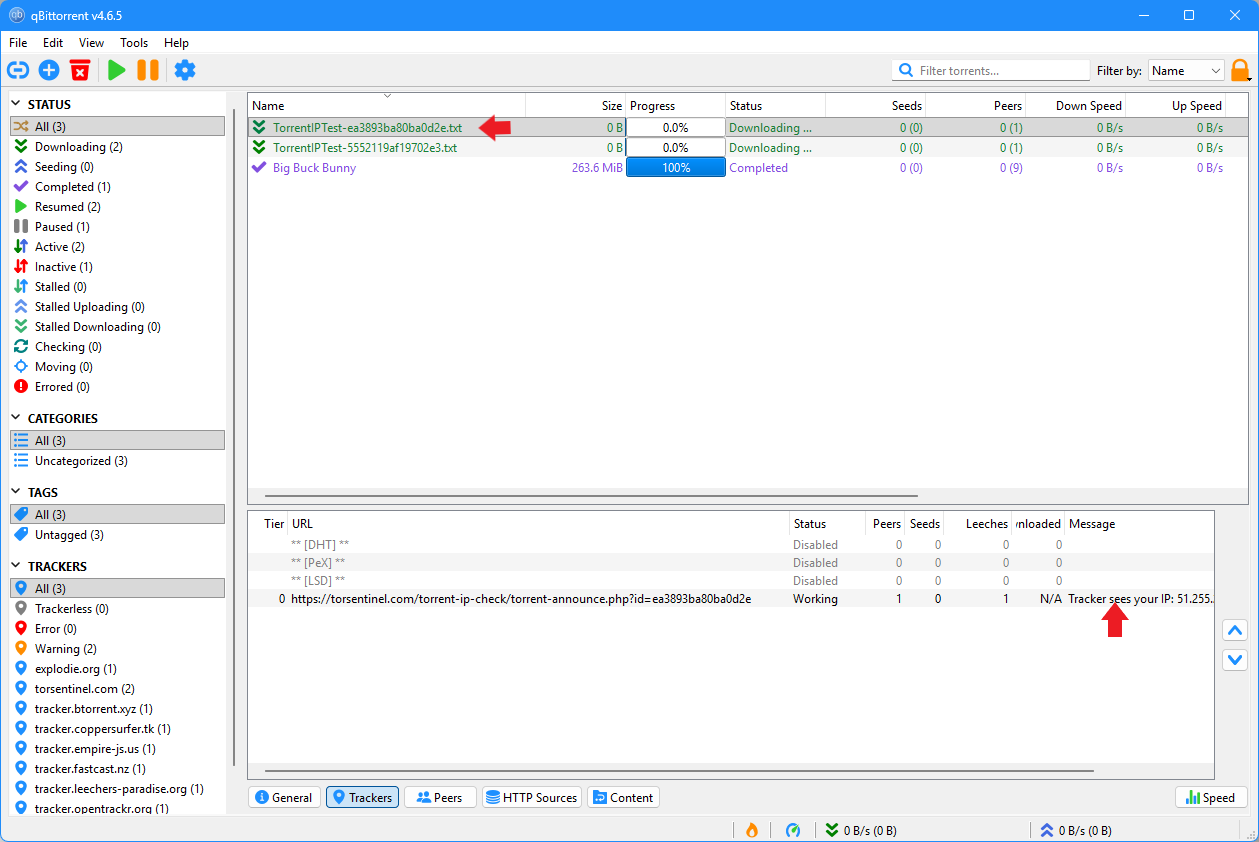
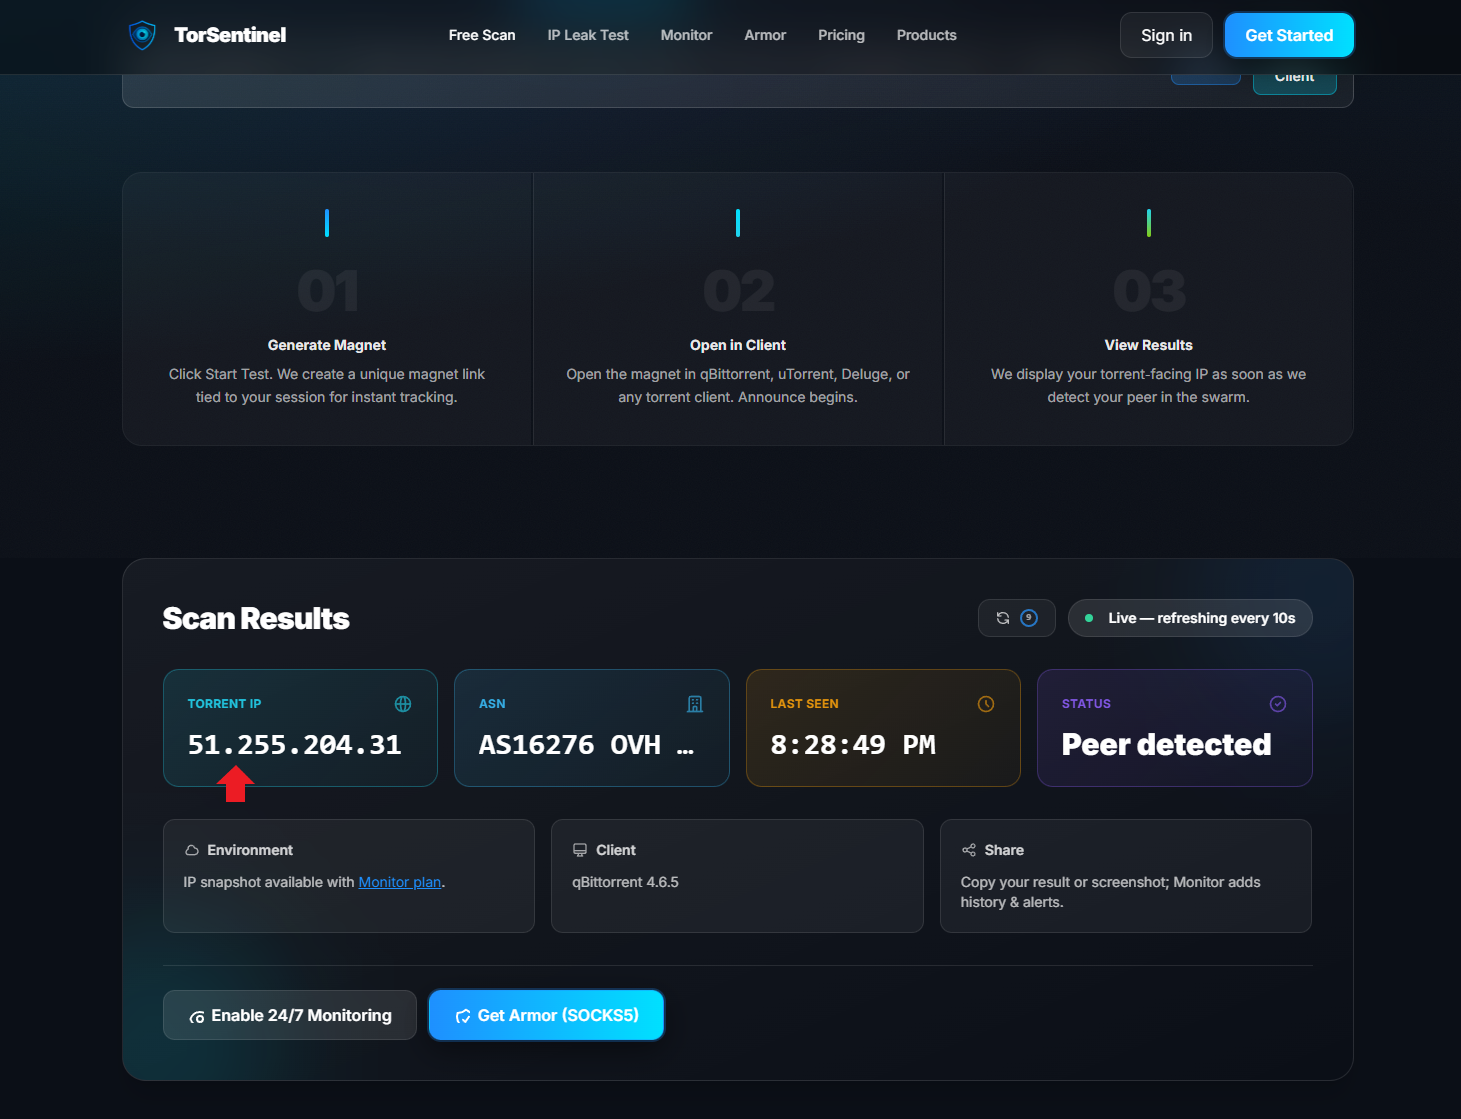
Verify with the free IP leak test

Before downloading anything real, confirm your setup is working. TorSentinel's free torrent IP check shows exactly what IP the swarm sees when your client announces — no signup required.

1 Go to torsentinel.com/torrent-ip-check and click Start Test
TorSentinel free torrent IP check page with Start Test button highlighted
Click Start Test — a unique magnet link tied to your session is generated instantly.
2 Click Open Client to open the magnet link directly in qBittorrent
TorSentinel page showing generated magnet link with Open Client button highlighted
Click Open Client — or copy the magnet link and paste it manually into qBittorrent.
3 qBittorrent opens the add torrent dialog — click OK to start
qBittorrent add torrent dialog for TorrentIPTest with OK button highlighted
Click OK — qBittorrent will begin announcing to the TorSentinel tracker immediately.
4 In qBittorrent, click the Trackers tab — confirm the tracker shows Working and your proxy IP in the message
qBittorrent Trackers tab showing torsentinel.com tracker as Working with IP address in message column
Tracker status: Working — the message column shows the IP the tracker detected, which should be your proxy IP not your home IP.
Back on TorSentinel — confirm the detected IP matches your proxy, not your home IP
TorSentinel scan results showing Peer detected status with proxy IP address
Peer detected — the Torrent IP shown is your proxy server IP. Your real IP is hidden from the swarm.
If you see your real IP: your proxy isn't routing correctly. Go back to Step 2 and make sure all four proxy checkboxes are enabled, and that hostname lookup via proxy is checked.
5

Optional: Enable 24/7 monitoring

The free tool gives you a one-time snapshot. TorSentinel Monitor watches your announces continuously and sends instant email or Telegram alerts if your torrent IP ever changes or leaks. The Armor plan includes both the SOCKS5 proxy and live monitoring together.

Common problems and fixes

qBittorrent won't connect with SOCKS5 enabled
Try a different port — use 1080, 1090, or 1095 instead of 1085. Some networks block specific ports. Also re-enter your credentials carefully; authentication failures look the same as connection failures in qBittorrent.
Speeds are slow through the proxy
Try a different port. TorSentinel Armor proxies are tuned specifically for torrent traffic and should deliver full peer connection speeds without VPN-level overhead.
IP check shows my real IP
DHT is almost always the culprit. Go back to Step 3 and confirm DHT, PeX, and Local Peer Discovery are all unchecked. Also verify hostname lookup via proxy is enabled in Step 2 — without it, DNS queries can reveal your real IP.
Tracker shows Error instead of Working
Check your username and password in Step 2 — a wrong credential causes a proxy authentication error which shows as tracker failure. Also confirm the proxy host is exactly proxy.torsentinel.com with no extra spaces.
Ready to protect your torrents?

Start your 7-day free trial

Get SOCKS5 Armor + 24/7 leak monitoring. Cancel anytime. No risk.